1 I want to be able to move this around in the shop, so I added some casters. They're 5.5" diameter and good for 250 pounds each; not a lot of extra capacity, especially when the cabinets are loaded with chucks and whatnot, but should be enough. I started with a plate of 1/2" thick steel JUST a bit wider than the cabinet, and so the cabinet sits on this plate on three edges. It's bolted down to the cabinet using the original nuts welded into the frame for the levelling feet. |
 2 The tailstock end. It IS on square, it's just the wide angle lens that makes it look off kilter. The machine will sit hard up against a wall, so I made this assembly the same width as the one at the headstock end, to maximize stability when moving (although I'm not sure I'll ever call it "stable"). The caster is not mounted all the way outboard for a reason (that will become clear later on). |
 3 |
 4 So, how do we get the machine out of the garage? We begin by building a nice strong ramp/platform. 2x10s, with 2x4s glued and screwed to the bottom with 3.5" #12 screws. Top and bottom edges are beveled. This platform will come in very handy. |
 5 The concrete slab here is sloped in two directions, so build it up until it's pretty much level with whatever is handy. This is a trial run and yup, it's going to work. |
 6 Next step, disassemble the hoist ... |
 7 The hoist in position. That's my sweetie, absolutely invaluable to the process, wearing pink and hoping to keep her hands clean. Boy, is she in for a shock. Note the stairs in the bottom left. We have to go around the corner to the right. |
 8 The lathe, out of the garage. |
 9 And down on the dolly again. |
 10 Around the corner, where there's another step to go down. Disassemble the hoist (because it's wider than the gap between the stairs and the shed on the left) and reassemble. Move the platform and roll the lathe onto it. We're getting closer; it's going into the door on the right. Notice that the rear wheels of the hoist are removed. They wouldn't get through the gap! |
 11 Another view of the problem. Now that's it's at the right level, we're left with the next issue; the door won't open! And I can't just drag the hoist and lathe backwards because there's no rear wheels on the hoist, remember? |
 12 The solution to the "no rear wheels" problem was to use the cart. I've obviously been able to open the door because here's the stand, with the lathe on the stand! |
 13 Moving it into place. |
 14 Tada, lathe on stand .. well, the heavy bits anyway! Nearing drinking time, you say. Nope, this is still the easy part! BTW, to get the stand spun around, there is about 1/16" clearance. Many hours were spent with the CAD package deciding if this would all fit. |
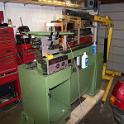
 15 The lathe now in the wood shop, heading for the metal shop. I use the word "shop" lightly; one is 8' x 12', the other is 7' x 10'. |
 16 The ramp now being placed to do actual "ramp" duties. It's lag screwed to the upper floor joist and a couple of hydraulic jacks are placed under each side, just in case. The gap in the back is the destination. Again, more CAD time. Things fit with about 1/2" clearance. I'm getting VERY lucky. |
 17 And there it is in place .. at least the stripped down version. Still to come are the electrics, motor, saddle, leadscrews, tailstock, covers .. you get the idea. Getting it in place seemed easy; I would be on the bottom, my wife would be on top, adding additional "woah" when required. And it was easy, right until all four wheels were on the ramp and gravity reared its sinister head. At that point, my wife said "eeek" and a great heavy chunk of metal came roaring down the ramp with its own idea of when it was going to stop. Thankfully, the combination of my VERY solid bench and my surprisingly compressive torso provided some nice shock absorbsion. |
 18 Another view of the problem; the doorway looks wide, but there's a corner ... |
 19 Another view of the located lathe. Note that the caster raises the assembly JUST enough to clear the foundation, allowing the lathe to sit a couple of inches closer to wall. In a tiny shop, every inch counts. |
 20 The tailstock end, looking straight down. The stand is RIGHT up against the bench and the caster mount is RIGHT up against the wall. Another case where time spent measuring paid off. I usually make WAY more mistakes than this and I'm never this lucky; I should go buy a lottery ticket. (Bought some Scotch instead). |